Your vacuum sealer stops mid-seal, the bag looks weak, and there’s food stuck around the edges. Most of these problems come from skipped cleaning, not broken parts.
Look after your vacuum sealer properly, and it’ll keep working for years longer than one that’s been neglected. That’s the difference between a $300+ replacement and a decade of reliable service.
Regular cleaning habits and maintenance routines can fix most common problems without a service call. These vacuum sealing tips work whether you’re just starting out or you’ve been sealing for years.
Why Bother With Maintenance?

Saves Money
Maintain your sealer properly, and it can last significantly longer than a neglected machine, often many years beyond average use. Poor maintenance commonly leads to early failure.
Your Food Stays Safe
Weak seals let oxygen back in. That means freezer burn on meat, shorter shelf life on everything, and potentially spoiled food. If you’re buying in bulk to save money or doing serious meal prep, bad seals waste the whole effort.
Good vacuum packaging protects food quality and reduces waste.
Avoids Expensive Repairs
A bit of food debris left on the heating element causes uneven heating over time. Moisture in the chamber damages internal parts, worn gaskets strain the vacuum pump, and small problems become big bills.
Types of Vacuum Sealers
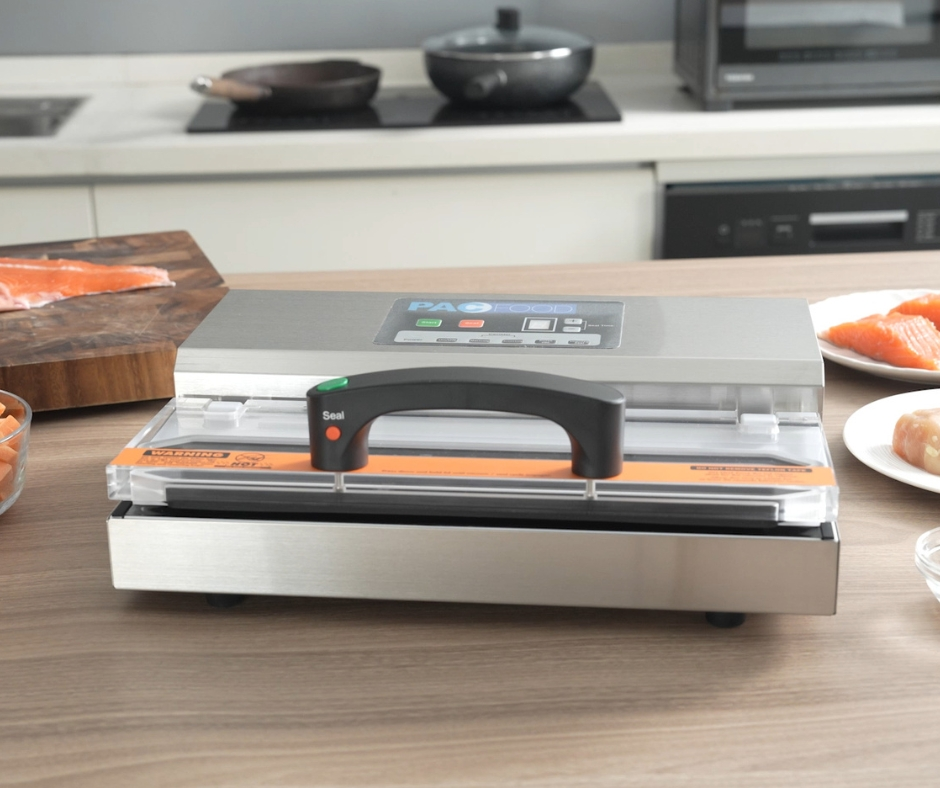
External/Suction models (like Pacfood’s VS105, VS300, VS603)
These countertop vacuum sealers are what most home cooks use. They suck air through the bag opening and seal the end. You need embossed or microchannel bags (the texture creates tiny holes that let air escape). They’re perfect for everyday food storage, meal prepping, and sous vide.
Chamber vacuum sealers
Chamber machines place the entire bag inside and remove air from the whole space. They handle liquids easily and work with both smooth and embossed bags.
They offer more power and versatility, and some models require more involved maintenance depending on the pump type.
Handheld vacuum sealers
Handheld sealers are portable and cheap. They work with special zipper bags or containers. Good for pantry staples and pantry items, but they’re not built for heavy use. Battery-powered models need less maintenance but offer weaker vacuum strength.
Why Clean Equipment Matters
Vacuum sealing only works when every part functions properly. The sealing process depends on clean surfaces, tight gaskets, and clear air pathways. Food debris blocks airflow, moisture corrodes parts, and even tiny particles prevent an airtight seal.
Regular maintenance ensures consistent vacuum strength for preserving food, proper seals that prevent freezer burn, longer equipment life, better food freshness in your freezer and fridge, and safe food storage for cooked meals and frozen food.
Parts You Need to Know
- Seal bar and heating element: Melts the bag to create your seal and collects the most food debris.
- Gaskets: Create the airtight seal by compressing when you close the lid, but they wear out from constant pressure.
- Vacuum chamber: The space where air gets removed, either around the whole bag (chamber models) or through the bag opening (external models).
- Vacuum pump: Removes the air, with simpler pumps in domestic models and more powerful ones in chamber machines that sometimes need oil changes.
- Lid and latch: Keeps everything aligned and compressed for proper sealing.

After Every Use (5 Minutes)
Wipe the seal bar
Food particles and invisible oils build up in the sealing area and ruin seals over time. Wipe it clean with a damp cloth after each use, but skip abrasive cleaners that can damage the Teflon coating. If you’ve sealed meat recently, check extra carefully, as those oils harden fast.
Check the gaskets
Check for stuck food in the grooves and wipe them down with a damp cloth. Small indentations are normal wear, but deep grooves mean it’s time for a replacement.
Empty the drip tray (chamber models only)
Empty it after every use or whenever you spot liquid. A quick rinse keeps bacteria from growing.
Check for liquid
If you’ve sealed something too wet, check your machine immediately. For external models, look under the lid at the vacuum pathway, wipe out any liquid, and let everything dry completely before using it again. Freeze liquids before sealing or use the pulse function on delicate foods to avoid this problem.
Store it right
Never latch the lid closed when storing your sealer. Constant pressure damages gaskets permanently, so leave it slightly open and keep dust off if you can. This simple habit doubles gasket life.
Weekly Deep Clean (Every 5-7 Uses)
Deep clean the seal bar
For stubborn residues, use isopropyl alcohol on a soft cloth to remove oils without damaging the sealing bar. While you’re cleaning, check for scratches or uneven wear that could explain bad seals.
Some external models use replaceable Teflon tape on the seal bar. Check your manual and replace it when you see wear or burn marks.
Thorough gasket care
If your gaskets are removable, pull them out and give them a proper wash in warm, soapy water. Dry them thoroughly before putting them back in. While they’re out, check for compression marks that won’t spring back. That’s your warning, they’re done.
Some manufacturers recommend using food-safe lubricant on gaskets. Check your manual first and only use what they specifically approve.
Monthly Tasks (Every 20-30 Uses)
Check the pump
Oil-lubricated vacuum pumps in chamber vacuum sealers need regular oil checks. Check your manual for the right type. If you hear grinding or excessive noise, it means trouble.
Full wipe down
Give your entire machine a proper clean once a month. Hit the exterior, clear lid, sides, and back. While you’re at it, check the power cord for any damage.
Don’t forget the air intake vents, they’re often overlooked, but they’re critical for preventing overheats. A soft brush or compressed air blasts out the dust.
Test your seal
Fill a bag with air, seal it, then dunk it in water. No bubbles means you’re good. If there are bubbles escaping, check the troubleshooting section below.
Fixing Common Problems
Weak or no vacuum
Your gaskets are probably the problem. Pull them out and check for wear, then look at the seal bar for any food debris. If you’ve been sealing liquids recently, moisture might have gotten into the vacuum pathway.
Worn gaskets need replacing. Clean every bit of debris you can find. If liquid got in, wipe it all out, let everything dry completely, then run a test cycle with an empty bag to make sure it’s working.
You can stop the problem from happening again by leaving proper space at the top of your bags and freezing liquids before you seal them.
Weak seal
A dirty sealing bar is one of the most common causes of weak seals. Sometimes it’s wrong settings on machines that let you adjust them, or occasionally a heating element that’s wearing out.
Clean the sealing bar properly with isopropyl alcohol. If your machine has adjustable settings, make sure they’re correct. Take a close look at the heating element for any damage. The best prevention is wiping the seal bar after every single use and always using the right bags.
Overheating
Your sealer has thermal protection that kicks in when it gets too hot. This happens when you push it too hard with continuous use, when the vents get blocked, or when you ignore the duty cycle limits.
Give your machine time to cool down between sealing cycles. Clean out those vents properly. Check your manual to see how many bags you can seal in a row. Trying to power through 50 bags without breaks will trigger the thermal protection every time.
Strange noises
Chamber machines with oil pumps might just need more oil. Screws can work themselves loose and rattle, or parts might be wearing out and starting to fail.
Check your oil level and top it up if your machine uses oil. Go around and tighten every screw you can find, and look at the moving parts to see if anything looks worn. If you’ve done all that and the noise continues, call in professional help.
Bag won’t stay put
Your gaskets have probably compressed too much and aren’t gripping properly anymore. Food debris stuck in the wrong place causes this too, or the latch mechanism might be out of alignment.
Give your gaskets a thorough clean, and make sure the latch closes squarely and isn’t sitting crooked. Also, double-check you’re using the right type of bag. External models absolutely need embossed bags because smooth ones won’t work.
When to Replace Parts
Typical lifespan estimates vary based on usage, environment, and maintenance.
| Part | Lifespan | Replace When | Cost |
| Gaskets | 12-18 months (heavy use), 24-36 months (light use) | Deep marks, cracks, tears | From $10 |
| Seal bar/Element | 3-5 years | Uneven heating, visible damage | From $5 – $30 |
| Drip tray | As needed | Cracks, warping | From $8 |
| Vacuum pump (chamber) | 5-10 years | Poor performance, loud noise | From $60 |
DIY vs professional
You can replace gaskets, drip trays, and accessories yourself. Pacfood’s VS603 includes spare Teflon tape and heating element. For electrical work, pumps, or complex repairs, get professional help.
Check your warranty first. Pacfood sealers typically include a manufacturer’s warranty. Check your specific model and purchase terms for exact coverage, and keep your purchase documents and service records.
Maintenance by Usage Level
Light use (1-3 times weekly)
You’re meal planning, preserving leftovers, or keeping vegetables fresh in the fridge.
- After-use checklist every time
- Deep clean monthly
- Annual inspection (chamber models only)
Moderate use (4-10 times weekly)
You rely on vacuum sealing for sous vide cooking, bulk buying, or serious meal prepping.
- After-use checklist every time
- Weekly deep clean
- Monthly full inspection
- Bi-annual service (chamber models)
Heavy use (daily/commercial)
Multiple times daily for commercial use. Small cafes, food trailers, processing game, and extensive preserving sessions.
- After-use checklist every time
- Deep clean twice weekly
- Monthly parts check
- Quarterly professional service
Australian Climate Tips
| Climate Zone | Challenge | What to Do |
| Coastal/Humid (QLD, NT, tropics) | High humidity accelerates gasket wear and moisture buildup | Replace gaskets every 12 months. Dry machine completely after use. Store near dehumidifier. Clean every 3-4 uses. |
| Dust/Rural (Inland, farms) | Vents clog faster, limited access to parts | Clean vents weekly. Cover when not in use. Keep spare gaskets on hand. |
| Seasonal (All regions) | Usage spikes during hunting (autumn/winter), fruit season (summer), Christmas prep (December) | Schedule deep maintenance before your heavy-use season starts. |
Beyond Food Storage
Vacuum sealers aren’t just for meal prep. They protect important documents from moisture damage, keep pre-cut herbs fresh in smaller portions, and prevent weevils in pantry staples like flour and sugar. Handheld sealers work fine for dry goods and documents, while chamber models handle liquids for sous vide cooking.
When to Get Professional Help
Get professional help when problems persist after you’ve cleaned everything and replaced parts. Burning smells or electrical issues need immediate attention, as do major mechanical failures like a broken pump or busted latch. If your warranty covers it, use it.
Professional service means a full inspection, pump servicing for chamber machines, quality parts replacement, and performance testing. When you call, have your model number ready, describe what’s wrong clearly, and tell them what maintenance you’ve already done. This helps techs diagnose faster and gets you back to sealing sooner.
Choosing the Right Vacuum Sealer
If you’re in the market or considering an upgrade, knowing maintenance requirements helps you choose. External countertop vacuum sealers need less care but can’t handle liquids as well. Chamber vacuum sealers require more maintenance but offer more versatility. Handheld vacuum sealers need the least maintenance but have limited power.
Pacfood’s range covers all bases. The VS105 suits light users, the VS300 handles moderate use, and the VS603 is built for serious home cooks and small commercial use. All require regular maintenance, but the effort matches the results.
Keep It Running
Proper maintenance isn’t complicated. Wipe the sealing bar after each use, check your gaskets, store the lid open, and set reminders for your weekly and monthly tasks.
Whether you’re using Pacfood’s VS105 for light work or the VS603 for heavy-duty sealing, these habits extend your machine’s life by years. Your food stays fresh longer, freezer burn becomes rare, and you waste less.
A clean machine seals properly every time. Make it routine, and equipment failure becomes something you read about, not experience.
FAQs
Is 2 year old vacuum sealed meat still good?
When frozen at or below 0°C, vacuum-sealed meat can remain safe for extended periods, but quality declines over time. Check for freezer burn, bad smells, or discolouration. If the sealed bag leaked air, the shelf life drops significantly.
For best quality: beef and game within 12-24 months, pork within 6-12 months.
How often should I change the oil in a chamber vacuum sealer?
Every 6-12 months, depending on use. Heavy commercial use needs quarterly checks. Home use might only need annual changes.
Some Pacfood models, including oil-free designs, do not require pump oil changes. Check your specific model manual to confirm. Dark oil or a weak vacuum means you’re overdue.
Can I use Ziploc bags in my vacuum sealer?
No. You need proper vacuum sealing bags. Regular plastic bags can’t handle the pressure and heat. External models like Pacfood’s VS300 and VS603 need embossed or micro channel bags where the texture lets air escape. Chamber vacuum sealers can use smooth bags, but they must still be proper vacuum bags. Wrong bags prevent seals and damage your machine.
What shouldn’t you vacuum-seal?
Never vacuum-seal soft cheeses, raw mushrooms, fresh garlic, or raw onions. They release gases that ruin seals. Don’t seal hot food directly, as it damages bags and your machine. Protect sharp bones with thicker bags. Use the pulse function on delicate foods like soft bread to prevent crushing. Let cooked meals cool completely to avoid moisture buildup.