Australian households throw away approximately 2.5 million tonnes of edible food every year, costing the average family $2,000–$2,500 annually. A vacuum sealer won’t fix every problem in your kitchen, but it will significantly cut down on the amount of food going off before you get to it. Pull the air out of a vacuum bag, heat-seal it shut, and food that would last a few days in the fridge can last weeks. Meat that would suffer freezer burn in six months can hold up for two to three years.
If you’ve got a vacuum sealer, or you’re thinking about buying one and want to know how to use it properly, you’ve come to the right place. We’ll cover how to set up and use both edge sealers and chamber vacuum sealers, which foods can and can’t be vacuum sealed, and the practical tips that can make a real difference to your results.
The Two Main Types of Food Vacuum Sealers
There are two main types of vacuum sealers worth knowing.
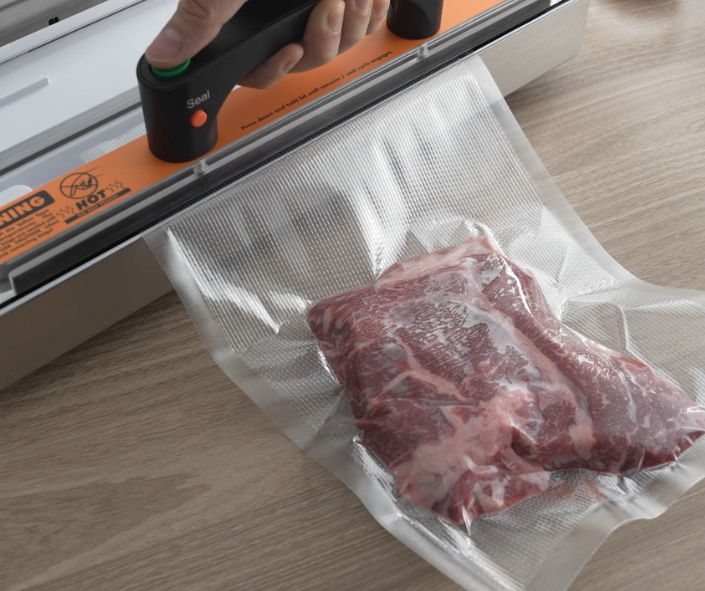
External vacuum sealers are the most common for home use. Place the open end of a vacuum bag over the sealing strip, and the machine draws out the air and heat-seals the bag shut. They’re affordable, easy to store, and suitable for most home cooks.
Chamber vacuum sealers are used in commercial kitchens and more serious home setups. The whole bag sits inside a chamber where air is removed before sealing. Chamber vacuum sealers handle sealing liquids and delicate foods without crushing them, and create a more complete vacuum. They’re bulkier and cost more, but they’re the better tool for high-volume use or anything involving liquids.
For most households, an external sealer does the job well. If you’re regularly sealing liquids or doing a lot of sous vide cooking, a chamber model is worth the investment.
Before You Start: Bags, Rolls, and Getting Set Up

Bag compatibility matters. External vacuum sealers require micro-channel bags, either standard or embossed. The channelled surface is what allows air to be drawn out evenly during the vacuum cycle. Smooth commercial bags won’t work with domestic external sealers. Chamber sealers use smooth bags, as the vacuuming happens inside the chamber itself rather than through the bag surface. Check your user manual to confirm which bags are compatible with your machine.
If you’re cutting from a roll, cut to length before filling. Leave at least 75–100mm of empty space at the open end to create an airtight seal. For moist or marinated food, allow a little more.
Label your bags before you fill them; writing on a bag already stretched over a cut of meat is awkward, and the ink smears. This matters most for meal prepping, where a full freezer of identical sealed bags becomes hard to sort through.
Pac Food’s range of vacuum sealer bags and rolls includes standard micro channel bags and heavier-duty embossed options, with sizes to suit everything from everyday meal prep to bone-in meat and long-term freezer storage.
How to Use an External Vacuum Sealer
Here’s the full process for using an external vacuum sealer at home.
Prepare your food first. It needs to be clean, dry, and cool. Never seal warm or hot food; steam creates condensation inside the vacuum bag, which undermines the seal and leads to freezer burn. Portion food into individual portions before sealing so you’re not defrosting more than you need. Most vegetables should be blanched and dried before vacuum sealing to stop enzyme activity and prevent gas release that can spoil the sealed bag over time. If you’re sealing meat with sharp bones, lamb chops, T-bones, whole fish, wrap the bone in a square of paper towel before placing it in the bag. This stops punctures under vacuum pressure.
Load the bag. Place your food inside and lay the bag flat on the bench. A chopping board placed in front of the machine mouth keeps the bag flat and stops it dropping away as air is extracted, particularly useful with taller models where the bag can slide down during the cycle.
Position and seal. Slide the open end of the bag into the vacuum channel so it sits flat against the sealing strip. Close the lid until it clicks. For dry foods, standard mode works well. For moist or delicate foods, berries, soft bread, marinated meat, use the pulse function or moist/gentle setting. This is the appropriate setting to avoid liquid being drawn into the machine or food being crushed during the vacuum process.
Run the cycle. Press the vacuum and seal button and let the sealing process complete without interrupting it. Once done, open the lid and inspect the heat seal; it should be a solid, continuous line across the full width with no gaps. If it looks uneven, run a second seal above the first. For anything with liquid content, double-sealing is a good habit.
Store immediately. Move sealed bags straight to the fridge or freezer. Don’t leave them sitting out.
How to Use a Chamber Vacuum Sealer

Chamber sealers work differently to external models and are better suited to high-volume use, sealing liquids, and anything where a more complete vacuum is needed.
Load the bag into the chamber. Place your filled bag inside the chamber with the open end resting on the sealing bar. The entire bag, including the food, sits inside the machine during the cycle. Because the vacuum is pulled from the whole chamber rather than through the bag, you can seal liquids, sauces, and marinades without them being sucked into the machine.
Close the lid and start the cycle. Seal the lid firmly and press the vacuum and seal function. The machine will evacuate air from the entire chamber, seal the bag, then release pressure and open automatically. Unlike external sealers, you don’t need to hold the bag in place or worry about it sliding.
Check and store. Inspect the seal line the same way you would with an external sealer; it should be consistent across the full width with no gaps. Move the sealed bag to the fridge or freezer immediately.
Settings to know. Most chamber sealers have adjustable vacuum levels. For delicate foods or anything you don’t want crushed, reduce the vacuum percentage rather than using full pressure. For dense cuts of meat or long-term freezer storage, full vacuum gives the best result. If your machine has a marinate function, it uses rapid pressure cycling to push marinade into the food faster, which is useful for prepping proteins before cooking.
Chamber sealers require smooth bags rather than micro-channel bags. If you’re currently using an external sealer and switching to a chamber model, your existing bag stock won’t carry over.
Foods You Can and Can’t Vacuum Seal
Most foods vacuum-seal well. Raw meat, fish, and seafood; hard and semi-soft cheeses; cooked meals; dry goods like flour, rice, sugar, coffee, nuts, and spices; cured meats; baked goods; whole fruits (freeze first); and oils all store significantly better when vacuum-sealed. It’s also one of the most practical ways to save money: buy food in bulk, divide it into individual portions, seal it, and freeze it.
Vacuum-sealed jars work well for dry pantry staples like coffee, nuts, rice, and spices, as well as anything you dip in and out of regularly, since they reseal easily. Check compatibility with your sealer model before buying.
But some foods need preparation first, and a few shouldn’t go in at all.
Cruciferous vegetables such as broccoli, cabbage, brussels sprouts, cauliflower, kale, and turnips release gases after harvest. Sealing them raw creates conditions for spoilage and anaerobic bacterial growth. Blanch and cool them fully before vacuum sealing, or seal from frozen. Celery falls into a similar category, with high moisture content, and the way it degrades means it’s best blanched or frozen before sealing rather than sealed raw.
Mushrooms and onions (including shallots and leeks) have the same issue. Freeze or cook first.
Raw garlic is the most critical one. Garlic in a low-oxygen environment can produce botulism toxin regardless of how it looks or smells. Do not vacuum-seal raw garlic.
Soft cheeses such as brie, camembert, cottage cheese, and ricotta won’t hold up to the pressure of the vacuum process and don’t store safely when sealed.
Sealing liquids directly is a problem for external vacuum sealers. Soups, stocks, and sauces should be frozen solid before going into a vacuum bag. Trying to seal liquids in an external sealer risks drawing the contents into the machine and damaging the internal seals. If you regularly need to seal liquids, a chamber vacuum sealer handles this without the same risk.
How Long Does Vacuum-Sealed Food Last?

The shelf life improvements are significant. These figures are only estimates and are based on proper sealing and appropriate storage temperatures.
| Food | Standard Storage | Vacuum Sealed |
| Beef / lamb (freezer) | ~6 months | 2–3 years |
| Ground meat (freezer) | ~4 months | Up to 1 year |
| Fish (freezer) | 3–6 months | Up to 2 years |
| Hard cheese (fridge) | 1–2 weeks | 4–8 months |
| Berries (fridge) | 1–3 days | Up to 1 week |
| Flour / rice / sugar | 6 months | 1–2 years |
| Cooked meals (freezer) | 2–3 months | 2–3 years |
| Oils | 5–6 months | Significantly longer |
Vacuum sealing can extend the shelf life of food by three to five times compared to standard storage methods. But it works best on fresh food; it doesn’t reverse deterioration that’s already started. A partial or uneven seal will let air back in over time. And vacuum sealing is not a substitute for refrigeration.
Vacuum Sealer Tips and Tricks for Better Results
A few habits make a noticeable difference to how well your machine performs and how long your sealed food lasts.
Never seal warm or hot food. Steam creates moisture inside the bag and leads to freezer burn, the exact problem you’re trying to prevent. Always let food cool completely first.
Avoid sucking liquid into the machine. It damages the internal foam seals and is a leading cause of early machine failure. For anything wet, freeze it first or use the pulse button to slow the vacuum process down.
Leave at least 75–100mm of clear space above the food at the top of the bag. If the food sits too close to the open end, the sealer can’t form a proper seal.
A few other things worth building into your routine:
- Always inspect the seal visually after each bag. If it looks uneven or has thin spots, run a second seal above the first.
- Protect bag material from sharp bones, fold a square of paper towel over the bone before placing it in the bag.
- Use the pulse function or gentle mode for moist, marinated, or delicate items like pastries, soft bread, and berries.
- Don’t lock the machine lid in storage. It compresses the foam gaskets and shortens their lifespan. Keep it open or resting lightly closed between uses.
- Replace foam seals roughly once a year for domestic machines, more frequently for heavy or commercial use.
- Use the seal-only function to reseal chip packets and biscuit bags without vacuuming, keeps snacks fresh without crushing them.
Uses Beyond Food Storage
Sous vide cooking requires vacuum-sealed bags. An external vacuum sealer works for most proteins and vegetables. If you’re regularly sealing marinades or sauces for sous vide, a chamber sealer handles it more cleanly. Pac Food carries one of Australia’s largest ranges of sous vide-compatible packaging for domestic and commercial use.
Fishing and hunting — portion and seal fresh catch or game straight after processing. Vacuum sealing fish extends freezer life from a few months up to two years and eliminates freezer burn.
Camping — pre-cook and seal meals at home, then reheat in the bag. Vacuum sealer bags also protect documents, maps, and first aid supplies from moisture.
Home organisation — jars and sealed bags both work for photos, spare parts, and anything humidity-sensitive during moves or renovations.
Travel — seal toiletries before packing to prevent leaks in your luggage.
Ready to Get More From Your Machine?
Pac Food supplies vacuum sealers, embossed micro-channel bags and rolls, and accessories for home kitchens and commercial use, with shipping available Australia-wide.
If you’re tired of buying groceries only to have food go off before you get to use it, vacuum sealing can make a big difference. It’s a simple way to store leftovers, prep meals ahead of time, keep ingredients fresher for longer and cut down on food waste.
Whether you need bags for the vacuum sealer you already own or you’re considering upgrading, browse our full domestic range.